Introduction to the Principle and Function of Beam Quality Analyzers
Have you ever used a beam quality analyzer, an optical instrument? Today, let’s introduce the beam quality analyzer.
A beam quality analyzer is a device that measures the intensity profile of a laser beam. Also known as a beam profiler or mode analyzer, it serves as a diagnostic tool capable of measuring the entire intensity cross-section of a laser beam. This means it can not only determine the beam radius but also capture detailed shape characteristics.
The beam quality analyzer can be used for the following purposes: Qualitatively displaying the beam cross-section aids in laser alignment, while measuring the beam radius at different positions along the optical axis allows for the calculation of the M² factor or the beam parameter product (BPP), providing a quantitative assessment of beam quality.

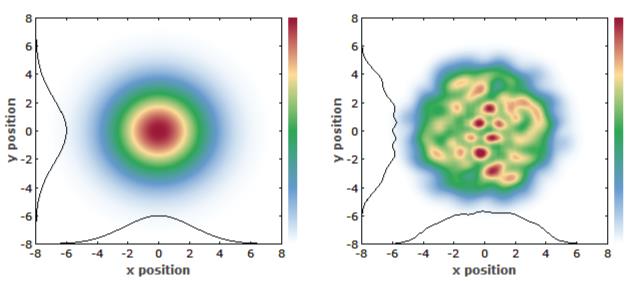
Figure 1: Intensity profiles of a Gaussian beam (left) and a multimode laser beam (right). The latter exhibits more complex intensity variations. Such multimode beams can be generated by lasers where the fundamental mode of the resonator is significantly smaller than the pumped area in the gain medium.
Controlling beam quality through appropriate laser beam diagnostics is crucial in many laser applications, such as material processing. For example, consistent beam quality ensures more uniform drilling results.
Camera-Based Beam Quality Analyzers
Many beam quality analyzers utilize digital cameras as their core components. For the visible and near-infrared spectral ranges, CMOS and CCD sensors are the most common. While CMOS devices are more cost-effective, CCD sensors offer better linearity and lower noise levels. Both CCD and CMOS cameras can achieve resolutions on the order of 5 μm (determined by pixel size), enabling measurement of beam radii as small as 50 μm or less. Their active sensor areas typically span several millimeters, making them suitable for analyzing relatively large beams.
Different wavelength ranges require specific sensor types. Silicon-based sensors work well for visible to near-infrared light (up to ~1.1 μm), while InGaAs detectors extend coverage to ~1.7 μm. For longer wavelengths—such as characterizing CO₂ laser beams—thermoelectric or microbolometer cameras are employed, though these tend to be more expensive. The high output power of such lasers offsets their relatively lower responsivity. For UV lasers, CCD/CMOS arrays can be paired with wavelength-converting phosphor plates to shift radiation to detectable longer wavelengths without damaging the sensor.
Spatial resolution is critical for camera-based systems. Silicon sensors may have pixels as small as 10 μm, allowing measurements of ~50 μm beam diameters. InGaAs detectors typically feature larger pixels (~30 μm), whereas thermoelectric arrays struggle to resolve below 100 μm. Lower spatial resolution necessitates larger beam sizes and longer Rayleigh lengths, demanding more physical space for M² measurements. Pixel count also matters practically, as higher counts accommodate a broader range of beam diameters.
When analyzing narrow-linewidth lasers, camera systems are prone to artifacts from temporal coherence. Mitigating these requires meticulous optical design (e.g., eliminating windows to avoid parasitic reflections).
Most cameras are overly light-sensitive, often necessitating attenuation before detection. Imaging optics (e.g., beam expanders) may be used to match the beam cross-section to the sensor plane, simultaneously suppressing stray light. However, such optics must avoid introducing aberrations.
Recorded beam profiles are displayed on computer screens alongside key parameters: beam radius, position, ellipticity, statistical data, or Gaussian fits. Software may employ various methods (e.g., D4σ or 1/e² criteria) to calculate beam radii.
Scanning Beam Quality Analyzers Using Slits, Knife-Edges, or Pinholes
Some beam analyzers employ one or multiple pinholes, slits, or knife-edges to scan the beam cross-section. In each case, mechanical components (mounted on rotating parts) rapidly traverse the beam while the transmitted power is recorded by a photodetector or electronic device. A computer (PC or built-in microprocessor) processes the measurement data to reconstruct the beam profile, which is then displayed on screen. For instance, the relationship between transmitted power and knife-edge position is differentiated to obtain a one-dimensional intensity profile, whereas a moving slit can directly acquire the intensity cross-section.
Scanning systems can achieve spatial resolution as high as several micrometers, even approaching 1 μm (particularly with pinholes or slits), making them suitable for characterizing small-diameter beams. A key advantage of scanning is that the photodetector does not require high spatial resolution, enabling compatibility with detectors across different wavelength ranges. Additionally, compared to camera-based systems, this method offers greater dynamic range, accommodating power levels from milliwatts to watts. Beam attenuation before reaching the detector is also more straightforward, as the required beam quality is significantly lower than for camera-based systems.
Scanning beam quality analyzers are particularly well-suited for beams with near-Gaussian profiles, especially when using slit or knife-edge scanning systems. However, since the recorded signals are typically one-dimensional, reconstructing complex beam shapes may yield less satisfactory results.
Some scanning beam quality analyzers can measure pulsed laser beams, such as those from Q-switched lasers. However, they are only applicable when the pulse repetition rate is sufficiently high; it should be noted that the minimum repetition rate depends on the beam diameter.

Beamfiler Beam Profiler
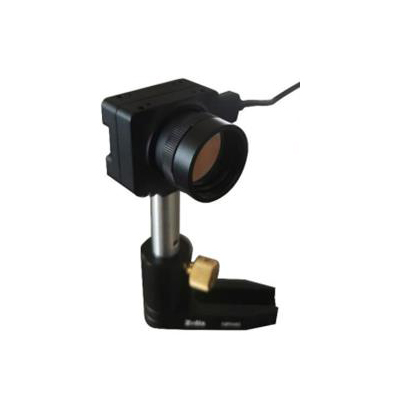
The Beamfiler Beam Profiler enables laser spot detection and testing applications, providing customers with customized integrated beam quality analysis solutions while supporting multi-application development. Through integrated optical design of the beam analysis system and matched attenuation solutions, it can measure spots with diameters as small as 40μm, supporting real-time exposure and gain adjustment.
This system can sample continuous visible laser spots, analyze parameters including spot center, radius, ellipticity ratio, and display the light intensity energy field in both 2D and 3D formats. It is widely applicable for scenarios requiring laser spot shape detection, such as laser production, maintenance, and laser applications. It is also commonly used for optical component quality inspection, laser cavity mirror alignment, external optical path collimation, and fiber optic coupling analysis.
Contact: Mr.Xiao
Phone: +86-13385280662
E-mail: market001@whlaser.cn
Add: Room 02, Floor 5, Building 9, Gezhouba Sun City, No. 40, Gaoxin 4th Road, Donghu New Technology Development Zone, Wuhan